

Updates & Home Improvement
Home Updates that Provide Exponential ROI
Home improvements can be overwhelming. And if you're wanting to put your house on the market, you probably don't want to spend an arm and a leg.
We've watched market trends and consulted with home owners for years and these are the top 5 updates we've found provide great Return On Investment. Without breaking the bank!
Read these 5 tips below or download the article!

#1: Swap Brass Fixtures & Hardware with Satin Nickel
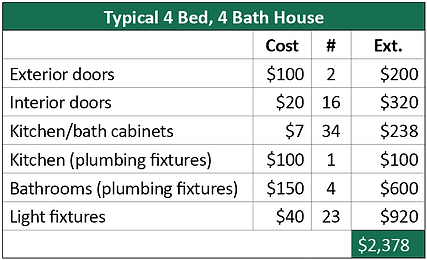
Many homes built pre-2000 have dated brass fixtures and hardware throughout. Brass was popular in the 80s and 90s, but has since been replaced with satin nickel. For less than $2,500, we are going to show you how to make your home look amazing with satin nickel updating. Experience tells us you can expect a 4X-5X return by swapping brass with satin nickel on your resale.
Budget
We've listed the approximate costs to swap out brass hardware for a typical 4 bed, 4 bath home in the Denver Metro area based upon research (and our personal experience) with Home Depot.
To determine how much you'll spend updating your particular home, count the number of interior and exterior doors, kitchen and bathrooms(including the number of cabinets), and light fixtures in your home. Multiply each figure by the respective cost and then sum them up. For even more detailed pricing, see the second table.*

How To
-
Shop. The itemized cost chart above can be used as an itemized list of fixtures and hardware you will need to purchase.
-
Tool Up. Before you start, ensure you have the right tools for the job (screw driver, pliers, dowel rods, etc).
-
Study Up. Make sure you know what you’re doing. Watch a quick video!**
Doors & Cabinets
Door/Cabinet Hinges & Strike Plates
Kitchen & Bathroom Plumbing Fixtures
Light Fixtures


Notes
*This list is not meant to be all-inclusive.
**Consult a licensed contractor with questions anytime you take on a DIY project. When working with electricity, ensure the breaker supplying electricity to the circuit you are connecting a light fixture to is turned off. Always consult a licensed electrician for advice and expertise as needed.
#2: Replace Canned Lights with Track & Pendant Lighting
Boxed fluorescent tube and canned lighting were both popular in kitchens during the 1980s and 90s. Unfortunately, many homes still have one or both! For under $125, you can replace your canned lights with popular track or pendant lighting for maximum appeal! This update will increase your ROI on resale by 5X-6X in the marketplace.
Track Lighting
-
When to Use? Use if you want a “ribbon of light” to provide ambient illumination over a general area or task lighting in a specific area. Use track lighting especially when there are one or two canned lights in the ceiling. Be careful though! If there are 3+ canned lights, it might look silly if you try to add track lighting.
-
Cost? $125-$250* at Home Depot and Amazon


Pendant Lighting
-
When to Use? Use if you want focused task lighting above a certain area, such as the breakfast bar in the kitchen. Pendant lighting is best used when there are 1-4 canned lights. Look for adapter kits for easy conversion from canned to pendant lighting.
-
Cost? You will need to purchase an adapter kit, pendant light shade with power supply cable, and light bulb (approximately <$100* per pendant light at Home Depot and Amazon.
*There may be additional materials that your property needs, therefore the cost noted above may not be all-inclusive. Consult a licensed contractor with questions any time you take on a DIY project. When working with electricity, ensure the breaker supplying electricity to the circuit is turned off. Always consult a licensed electrician for advice and expertise as needed.
#3: Replace Electrical Switches/Outlets & Alarms
If your home is >10 years old, consider replacing the electrical switches and outlets, as well as the smoke and carbon monoxide alarms in your property. The reason is three fold: safety, visual appeal, and enhanced ROI on the resale value of your home. Most single family homes can be updated for <$1,000. Experience has taught us this simple and easy-to-do update can yield a 6X-8X ROI for your home.
-
Safety: Smoke and carbon monoxide alarms should be replaced every 10 years, however most homeowners forget to do this. (Note that just because they still chirp, doesn’t mean they can still detect deadly fumes!) Rather than purchasing separate smoke and carbon monoxide alarms, buy a combo alarm and save money.
-
Visual Appeal: Electrical switches/outlets and smoke/carbon monoxide alarms that are >10 years old are usually an ugly brown color from years of use, sunlight, and cobwebs. These are unsightly to guests and prospective buyers of your home and suggest a lack of home maintenance and safety.
-
Enhanced ROI: The actual and perceived enhancement of safety and visual appeal makes guests and buyers feel you have taken good care of your property. Complimented with other upgrades, your home’s perceived value will increase exponentially!
The table to the right shows the cost of replacing electrical switches/outlets** and smoke/carbon monoxide alarms in a typical 4 bed, 4 bath home based upon research (and personal experience) with Home Depot and Amazon.
To estimate how much you'll spend, count the number of switches, outlets, phone/cable covers, and smoke/carbon monoxide alarms. Multiply each figure by the respective cost (see the first table) and sum them up. A more detailed cost list is also provided.*


Notes:
*This list is not meant to be all-inclusive. **Consult a licensed contractor with questions anytime you take on a DIY project. When working with electricity, ensure the breaker supplying electricity to the circuit you are connecting a light fixture to is turned off. Always consult a licensed electrician for advice and expertise as needed. For future sellers… Colorado State Law requires that carbon monoxide alarms be located within 15 feet of every bedroom in the home. Before listing your home, ensure your current alarm setup is adequate.
#4: ADD A TV WALL MOUNT
-
What: If your home was built pre-2010, there is a good chance it does not have a TV wall mount. Homes that have updated TV wall mounts vs. standard entertainment setups are perceived as being more updated and valuable by buyers. Adding a TV wall mount can give you a 5X ROI.
-
Why: Let’s face it – exposed wires and cables are a thing of the past and today’s consumer desires a cleaner, more simple aesthetic in their homes. Adding a TV wall mount is an inexpensive update and will make your living room appear slightly larger (no bulky entertainment center anymore) and more elegant.
-
Cost: The Home Depot has several models to choose from, ranging in cost from $25-$120, depending upon size and features. Add another $50 for tools and additional materials (as needed) and you’re in business.

“How To” Step by Step (Detailed Instructions)
-
Remove the TV
-
Locate Studs
-
Prepare the Conduit (hides cables)
-
Drill the Holes
-
Pull the Wire and Conduit
-
Insert Tube & Secure Cord
-
Secure Fishstick
-
Attach the Voltage Box
-
Insert the Receptacle Box
-
Check Alignment & Tighten Screws
-
Push Cables Through & Snap Faceplates
-
Plug into Power
Potential Pitfalls*:
-
Ensure you buy a mount large enough for your TV
-
Have a plan for your power source, cables and connectivity
-
Ensure you anchor the wall mount to studs or other support
Notes: *This list is not meant to be all-inclusive. Consult a licensed contractor with questions anytime you take on a DIY project. Hire out the work if needed.

#5: UPDATE THAT INTERIOR PAINT
A fresh coat of paint is one of the easiest ways you can update your home and receive a positive return on your investment; the best part is that very little training is needed! You can enjoy a 2-3X ROI for repainting your home.
The first step is picking your paint colors. To do this, assess the interior style of your home. Is your home, contemporary, traditional, transitional, or something else? The identifying traits of each style are below.
Contemporary:
-
Colors: white, grey, dark brown, dark red, navy blue
-
Flooring: dark wood or white tile
-
Countertops: quartz or solid surface
-
Kitchen Lights: pendant lights
-
Light fixtures: flashy and sleek
-
Finishes: satin nickel or chrome
-
Furniture: sleek, simple with profiles and shapes
Traditional:
-
Colors: light brown, blonde, and other earth tones
-
Flooring: light wood floors or tile with an earth tone color palette
-
Countertops: granite
-
Kitchen Lights: canned lights in kitchen
-
Light fixtures: unembellished light fixtures
-
Finishes: oiled-rubbed bronze or satin nickel
-
Furniture: traditional in comfort and design
Once you determine your home’s current style, decide if you want to change it or not. Currently, contemporary style homes sell better than traditional homes, however don’t use this generality to “over-improve” your home. If you’re trying to decide how to update your property (beyond paint on the walls), don’t hesitate to give us a call. Spending too much on certain aesthetics may end up costing you money by failing to give you the return on investment you’re looking for!
If you decide to go for a contemporary color tone, here are some of our favorite selections from Sherwin Williams, some of which Bryan recently selected for his own home.

